

Candles are one of the oldest and most versatile forms of lighting. They can create a cozy atmosphere, set a romantic mood, or add a touch of elegance to any space. Candles can also be customized with different shapes, colors, scents, and decorations to suit your personal style and preferences.
If you love candles and want to make your own, you might be wondering how to get started. Candle making is a fun and rewarding hobby that anyone can enjoy. It is not very difficult or expensive, and you can unleash your creativity and imagination. You can also make candles as gifts for your friends and family, or even sell them online or at local markets.
In this blog, we will guide you through the basic steps of candle making and give you some tips and tricks to make your candles look and smell amazing. We will also tell you where to find the best candle making supplies and how to save money by buying wholesale candle making supplies.
What You Need to Make Candles
The first thing you need to make candles is candle wax. There are different types of wax available, such as coconut soy wax, soy wax, beeswax, and gel wax. Each type has its own advantages and disadvantages, depending on the desired outcome. For example, paraffin wax is the most common and cheapest wax, but it can produce more soot and smoke than other waxes. Soy wax is natural and eco-friendly, but it can be softer and less stable than other waxes. Beeswax is also natural and has a pleasant honey scent, but it can be more expensive and harder to work with than other waxes. Gel wax is transparent and can hold more fragrance than other waxes, but it can be tricky to melt and pour.
The second thing you need to make candles is a wick. The wick is the part that burns and carries the flame. The size and type of the wick depend on the size and type of the candle you are making. You can also use wooden or multiple wicks for different effects.
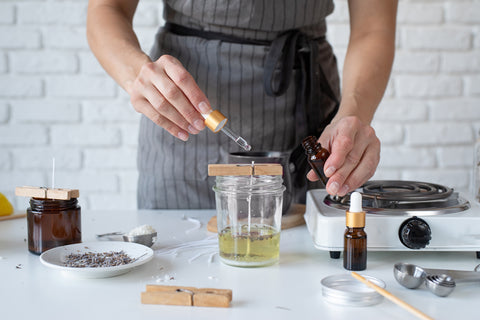
The third thing you need to make candles is fragrance oils or essential oils. These are the substances that give your candles their scent. You can choose from a wide variety of fragrances, from floral to fruity to spicy to woody. You can also mix different fragrances to create your own unique blends. The amount of fragrance oil or essential oil you need depends on the type of wax you are using and how strong you want your scent to be. Generally, you can use about 6-10% of fragrance oil or essential oil per weight of wax.
The fourth thing you need to make candles is dyes or colorants. These are the substances that give your candles their color. You can use liquid dyes, dye chips, dye blocks, or crayons to color your candles. You can also experiment with different shades and combinations of colors to create interesting effects. The amount of dye or colorant you need depends on how dark or light you want your color to be. Generally, you can use about 0.1-0.5% of dye or colorant per weight of wax.
The fifth thing you need to make candles is molds or containers. These are the shapes that hold your candles while they cool and set. You can use metal molds, silicone molds, glass jars, tin cans, or any other heat-resistant containers that suit your style and purpose. You can also decorate your molds or containers with stickers, ribbons, labels, or other embellishments.
The sixth thing you need to make candles is a double boiler or a microwave-safe bowl. This is what you use to melt your wax safely and evenly. You can either use a double boiler on the stove or a microwave-safe bowl in the microwave to heat your wax until it reaches its melting point (usually between 175-185 degrees depending on the type of wax). You should never heat your wax directly on the stove or in the oven as this can cause fire hazards.
The seventh thing you need to make candles is a thermometer. This is what you use to measure the temperature of your wax while melting it and before pouring it into your molds or containers. The temperature of your wax affects how well it binds with the fragrance oil or essential oil and how smoothly it pours into your molds or containers.
The eighth thing you need to make candles is a stirring stick or a spoon. This is what you use to stir your wax while melting it and after adding the fragrance oil or essential oil and the dye or colorant. Stirring your wax helps to distribute the ingredients evenly and prevent air bubbles from forming.
The ninth thing you need to make candles is a wick holder or a wick stabilizer. This is what you use to keep your wick centered and straight in your mold or container while your candle cools and sets. You can use a metal wick holder, a wooden skewer, a clothespin, or any other device that can hold your wick in place.
The tenth thing you need to make candles is a pair of scissors or a knife. This is what you use to trim your wick after your candle has cooled and set. You should trim your wick to about 6mm before lighting your candle to prevent excessive smoke and soot.
How to Make Candles
Now that you have all the necessary candle making supplies, you are ready to make your candles. Here are the basic steps to follow:
- Prepare your work area. Cover the surface with newspaper or a brown paper bag to protect it from spills and drips. Gather all your materials and tools and have them ready.
- Prepare your mold or container. If you are using a metal mold, spray it with some mold release spray or rub it with some vegetable oil to make it easier to remove your candle later. If you are using a glass jar or a tin can, wash it and dry it thoroughly. If you are using a silicone mold, no preparation is needed.
- Prepare your wick. Cut your wick to the length of your mold or container plus about 5cm. Thread one end of the wick through the hole of the wick holder or the wick stabilizer and secure it with a knot or a dab of glue. Place the other end of the wick in the center of your mold or container and press it down firmly.
- Melt your wax. Place your wax in the double boiler or the microwave-safe bowl and heat it until it melts completely. Use the thermometer to check the temperature of the wax and adjust the heat accordingly.
- Add your fragrance oil or essential oil and your dye or colorant. Once your wax has melted, remove it from the heat and stir in your fragrance oil or essential oil and your dye or colorant. Use the measuring spoons or droppers to measure the amount of ingredients you need and mix them well with the stirring stick or the spoon.
- Pour your wax mixture into your mold or container. Carefully pour your wax mixture into your mold or container, leaving some space at the top for shrinkage. Use the stirring stick or the spoon to scrape off any excess wax from the sides of the double boiler or the microwave-safe bowl.
- Secure your wick. Use the wick holder or the wick stabilizer to keep your wick centered and straight in your mold or container while your candle cools and sets. Adjust the position of the wick if needed.
- Let your candle cool, set, and cure. Leave your candle undisturbed in a cool and dry place for at least 24 hours or until it hardens completely. Do not move or touch your candle while it is cooling as this can cause cracks or bubbles to form.
- Remove your candle from the mold or container. If you are using a metal mold, gently tap it on a hard surface to loosen the candle and pull it out carefully by the wick. If you are using a glass jar or a tin can, no removal is needed. If you are using a silicone mold, peel off the mold from the candle slowly and gently.
- Trim your wick. Use the scissors or the knife to trim your wick to about 6mm before lighting your candle.
Congratulations! You have just made your own candle!
Tips and Tricks for Making Candles
Here are some tips and tricks to make your candles look and smell amazing:
- Experiment with different types of wax, wicks, fragrances, colors, and decorations to create unique candles that reflect your personality and taste.
- Use less fragrance oil or essential oil for lighter scents and more fragrance oil or essential oil for stronger scents.
- Use less dye or colorant for lighter colors and more dye or colorant for darker colors.
- Use different shades and combinations of colors to create gradient, swirl, marble, layered, or rainbow effects.
- Use different shapes and sizes of molds or containers to create different styles of candles, such as pillar, votive, tealight, taper, jar, tin, etc.
- Use molds with intricate designs or patterns to create textured candles that look more interesting and attractive.
- Use molds with holes or cutouts to create hollow candles that can hold tealights inside them for extra illumination.


Comments (1)
Thanks for sharing such great information. It is really helpful to me. I always search to read quality content and finally I found this in your post. keep it up! Your work is so good your writing is so clear I liked it you are a great writer. I appreciate your work.
Candles Making Supplies